


Carf rebel pro

 01-31-2023, 08:47 AM
#627
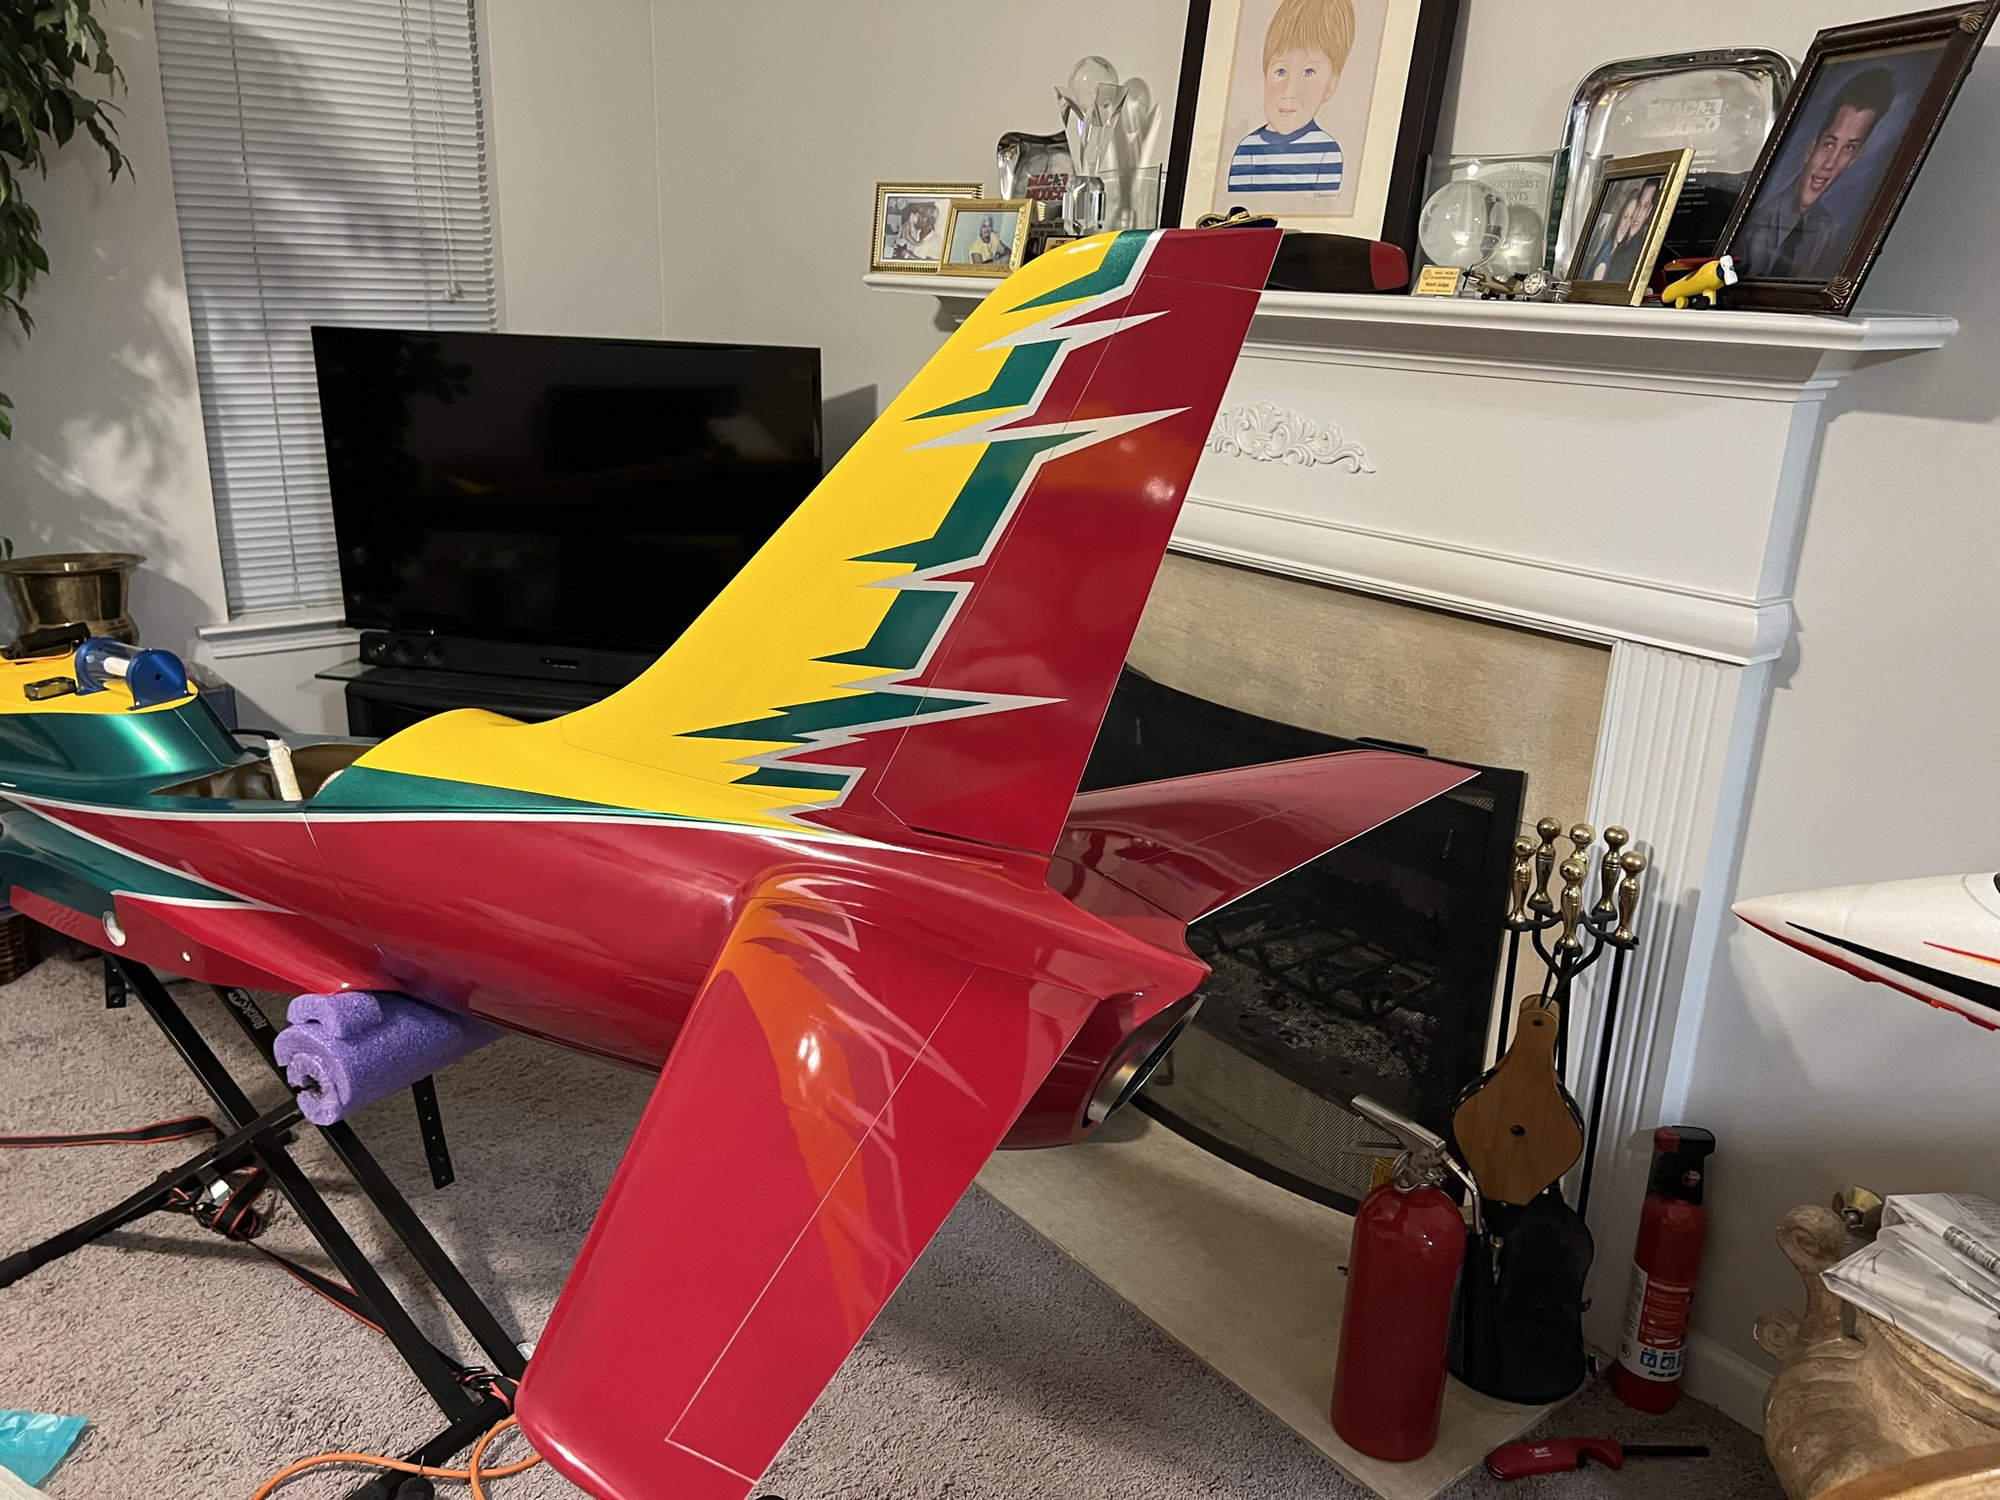
I finished the right wing flap & aileron setup yesterday and final installed the vertical stab/rudder this morning. Something that I did to secure the back end of the vertical stab. I glued in a ply plate at the very back end of the vertical stab as when the front was screwed down, the back was about 1/16" off of the plate. I drilled through and used a screw to hold the back down and now it's solid.
Time for rolling loops practice!!
Wayne

Time for rolling loops practice!!
Wayne
The following users liked this post:
bodywerks (04-06-2023)
01-31-2023, 09:34 AM
#628
Senior Member
Wayne that's a good tip trick for the Rudder, makes it more firmly attached to the fuse and easy to access . 
I still like your color scheme should really pop in the sky
I still like your color scheme should really pop in the sky
The following users liked this post:
sewbusy (01-31-2023)
01-31-2023, 09:38 AM
#629

My Feedback: (1)

I finished the right wing flap & aileron setup yesterday and final installed the vertical stab/rudder this morning. Something that I did to secure the back end of the vertical stab. I glued in a ply plate at the very back end of the vertical stab as when the front was screwed down, the back was about 1/16" off of the plate. I drilled through and used a screw to hold the back down and now it's solid.
Time for rolling loops practice!!
Wayne
Time for rolling loops practice!!
Wayne

Love that idea. While I haven't had any issues, this is fantastic, man.
The following users liked this post:
sewbusy (01-31-2023)
01-31-2023, 09:43 AM
#630
Senior Member
 01-31-2023, 09:51 AM
#631
I hope the invoice doesn't put me into cardiac arrest!!I may step up to Archie & Mike McConville's class and fly the "F" sequence!! That one has the rolling loop in it....PLUS...There are only 2 competitors in that class...so at least I'm guaranteed 3rd place!!
")
W
The following users liked this post:
Skunkwrks (01-31-2023)
01-31-2023, 09:53 AM
#632
Senior Member
This schedule" F", is very advanced similar to unlimited in Imac

Last edited by Skunkwrks; 01-31-2023 at 10:01 AM.
01-31-2023, 09:57 AM
#633
My Feedback: (1)
Copy that. No worries on the phone calls man. I enjoy our conversations. Yeah, the F- sequence is pretty cool. I've already flown it a few times but not sure I'd be OK with Archie beating me....maybe.
The following users liked this post:
sewbusy (01-31-2023)
01-31-2023, 09:59 AM
#634
One thing I forgot to mention...Since the center section of the vertical stab has a "gob" (raised) of glue along the center line, I didn't want to drill right through there, possibly causing both halves to split...so I offset the hole slightly to the right.
W
The following users liked this post:
Skunkwrks (01-31-2023)
03-23-2023, 05:27 AM
#635
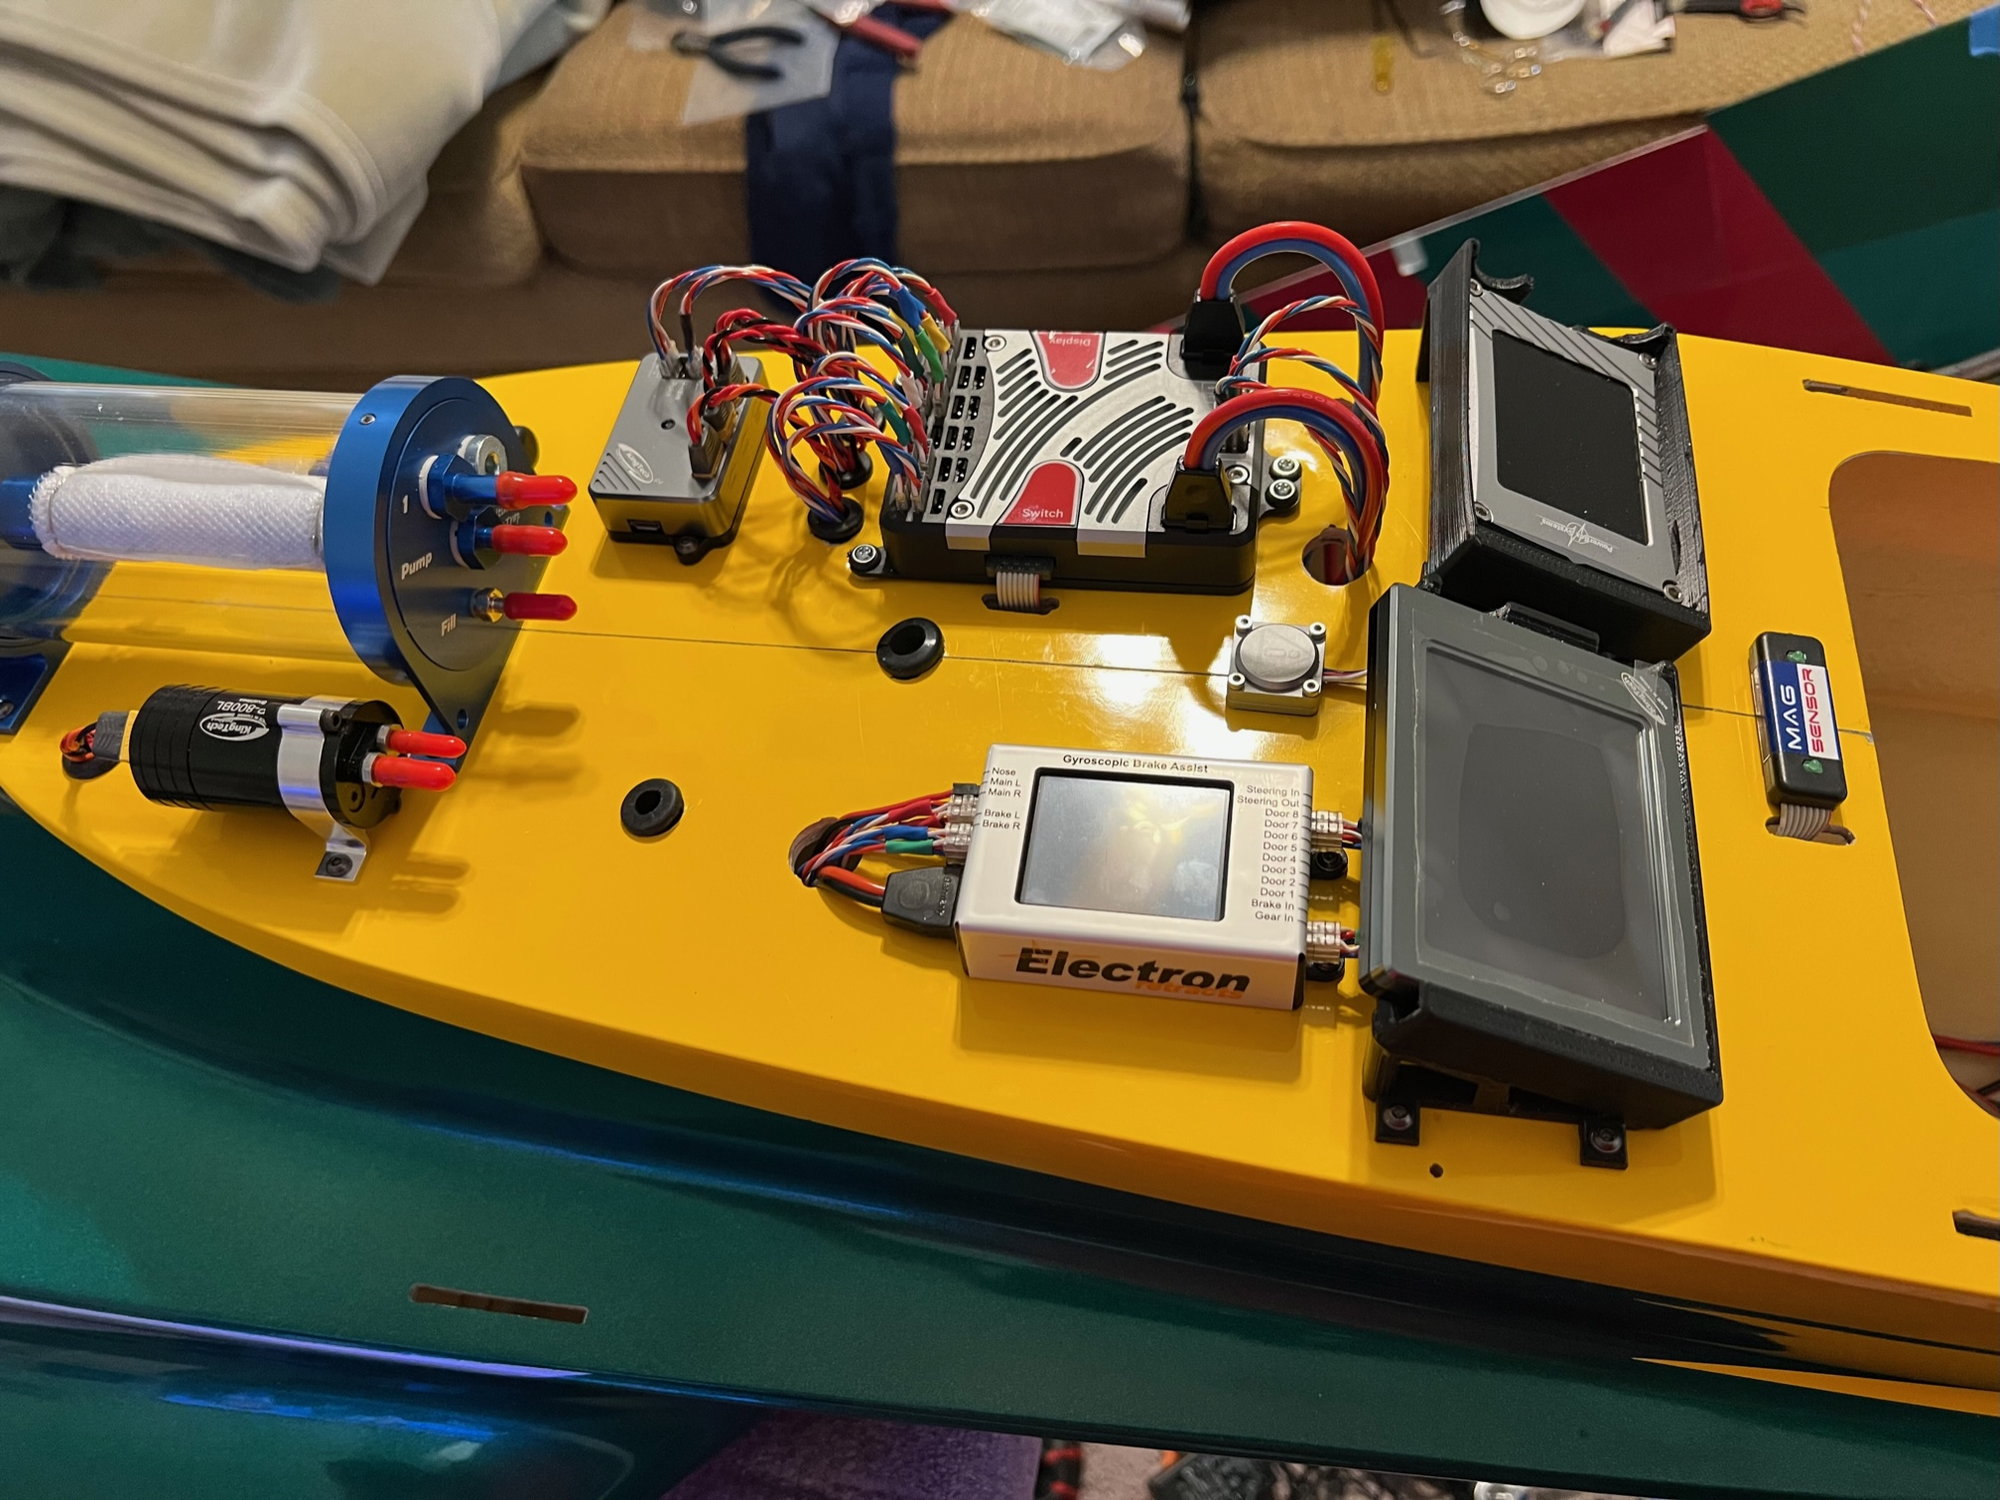
Work progressing on my Pro.....a bit slow as business has picked up and the Joe Nall is also around the corner, where we do the embroidery for the event.
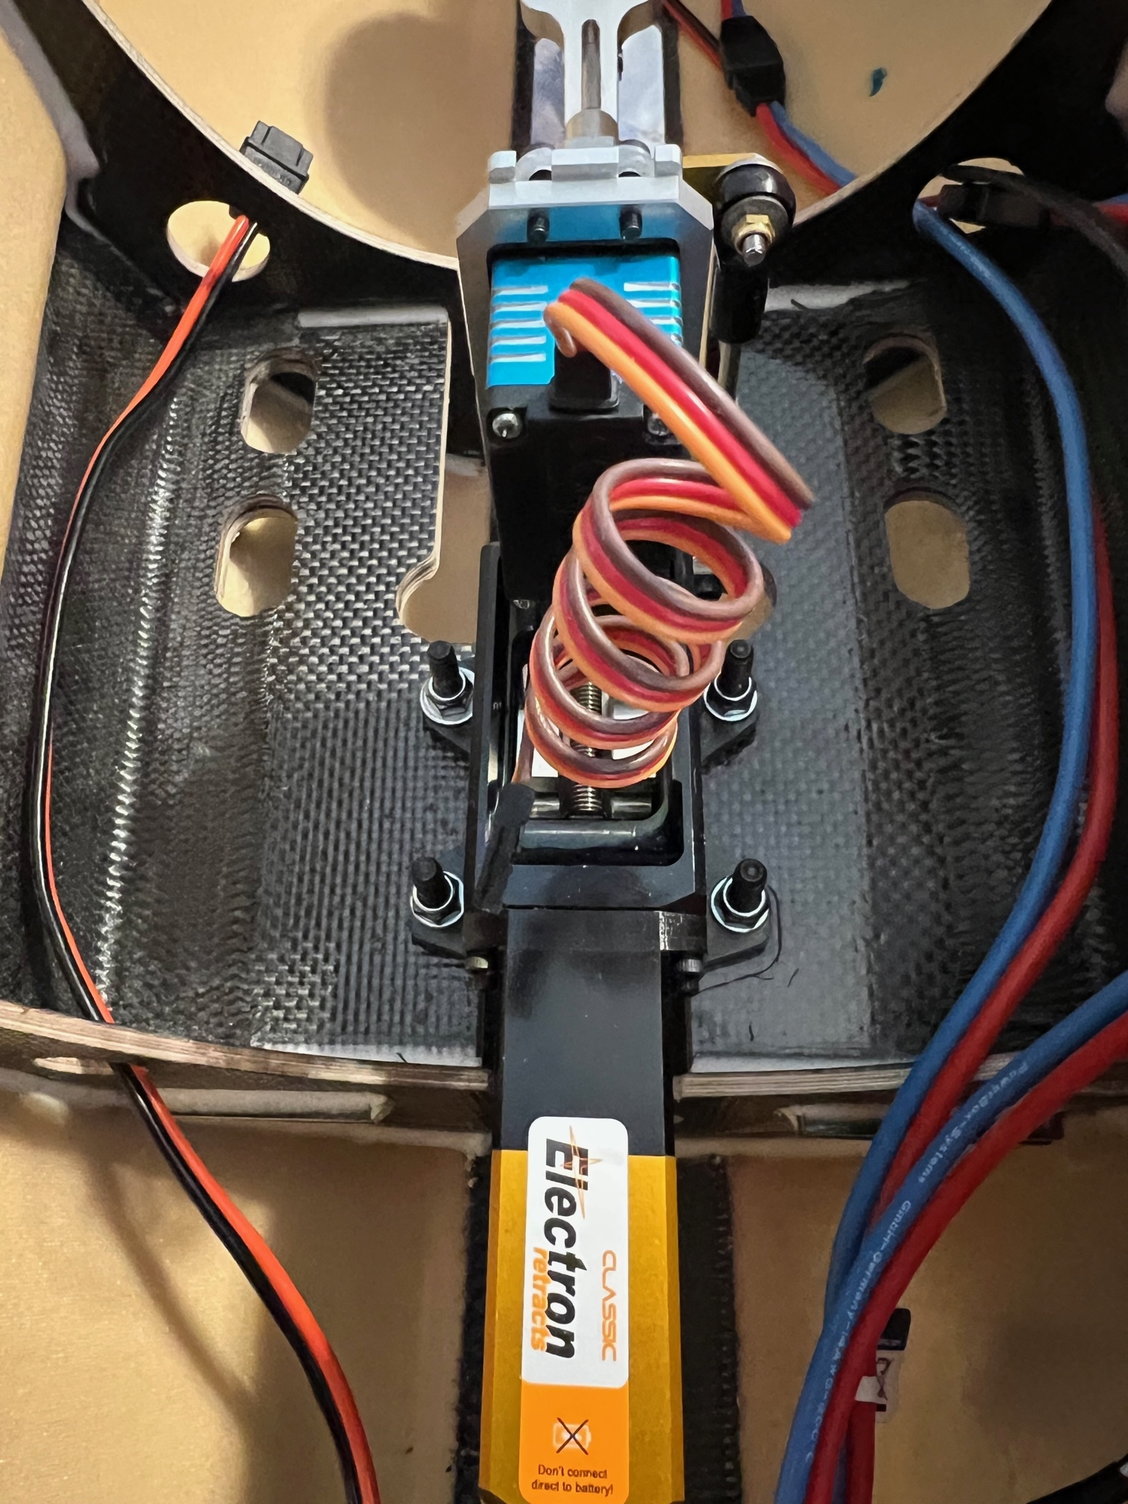
After installing the L/Gears, I've now finished running all the wires for the jet and now I have to secure those wires that are like Atlanta's "spaghetti junction" below the deck. On the front gear, I decided to install it above the platform as opposed to everyone installing it below. I checked with CARF before doing it & they said "go for it!" It will have a slight nose down attitude like a race car! If I don't like how it works...it will be a simple matter of just switching it below.
The final piece of the puzzle is to run all the fuel tubing and secure them. I plan on running the KT235 G4+ next weekend and maiden her on the first weekend in April or just before if the weather permits. She is about 8.5lbs lighter than my Leonardo....so I can see a bright future with this baby. I will be competing in the F3S class of FAI at the Jet Nationals in August. We have quite a few jet pilots who have already registered to attend and expect a few more to jump off the fence before the event rolls around.
Wayne
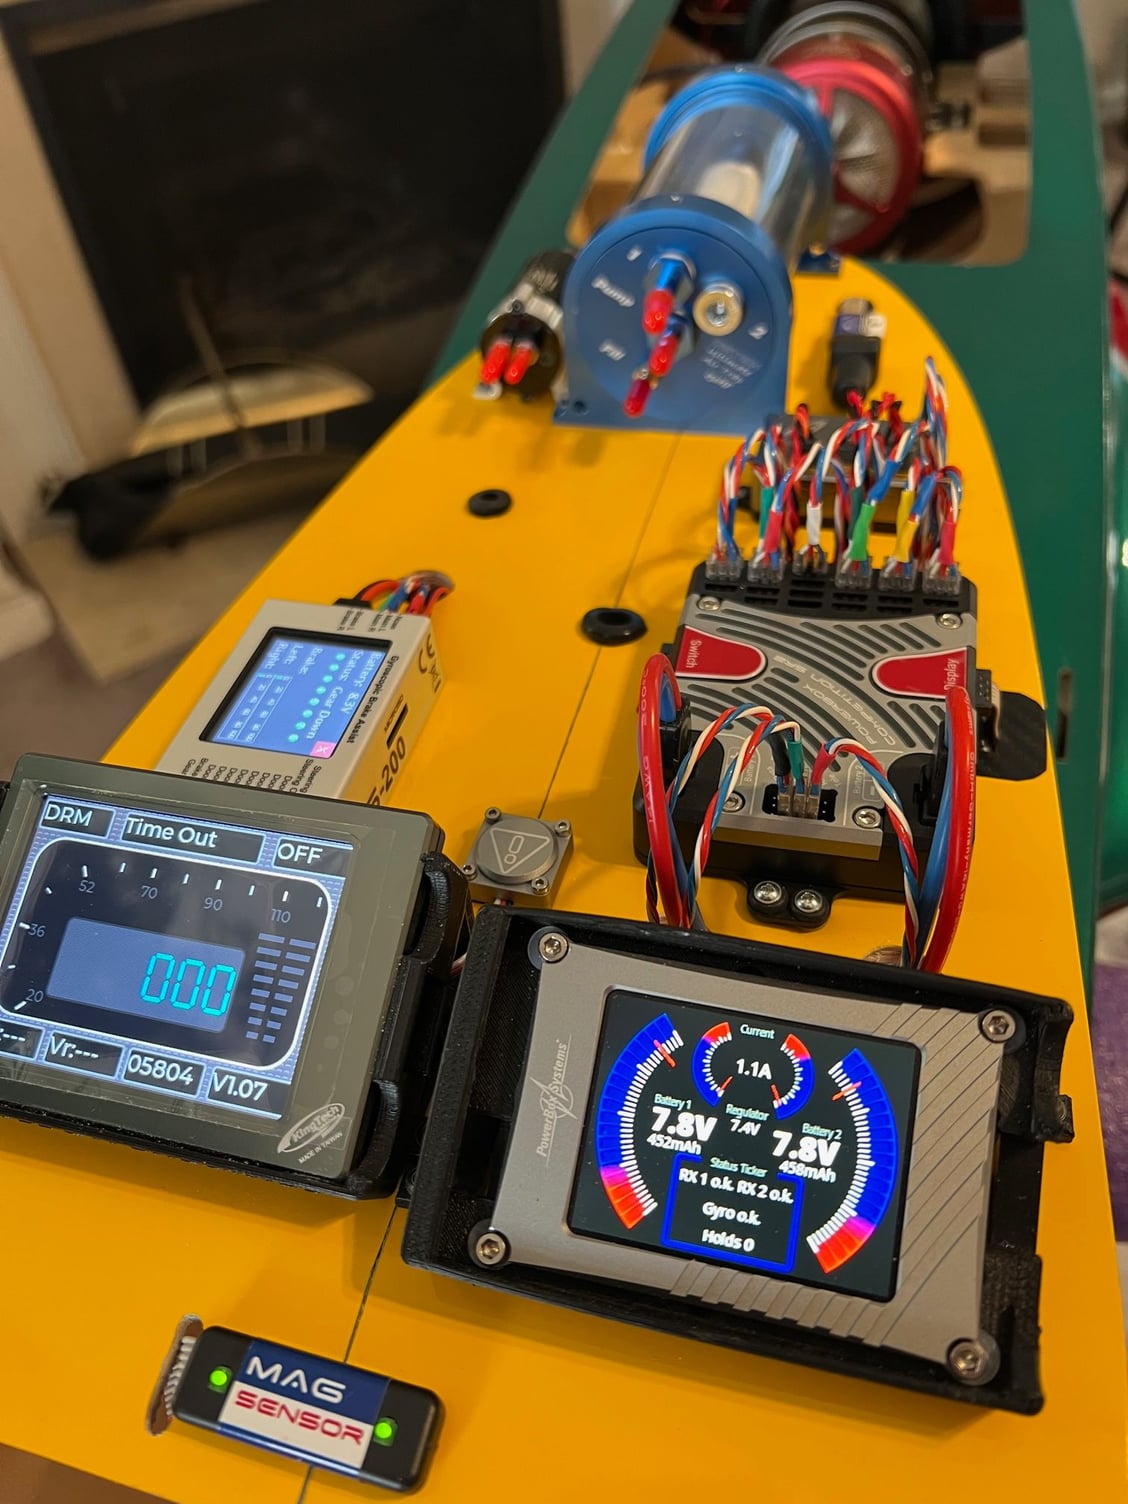
The following users liked this post:
bodywerks (03-29-2023)
03-23-2023, 07:04 AM
#637
W
The following users liked this post:
sewbusy (03-23-2023)
03-23-2023, 07:20 AM
#639
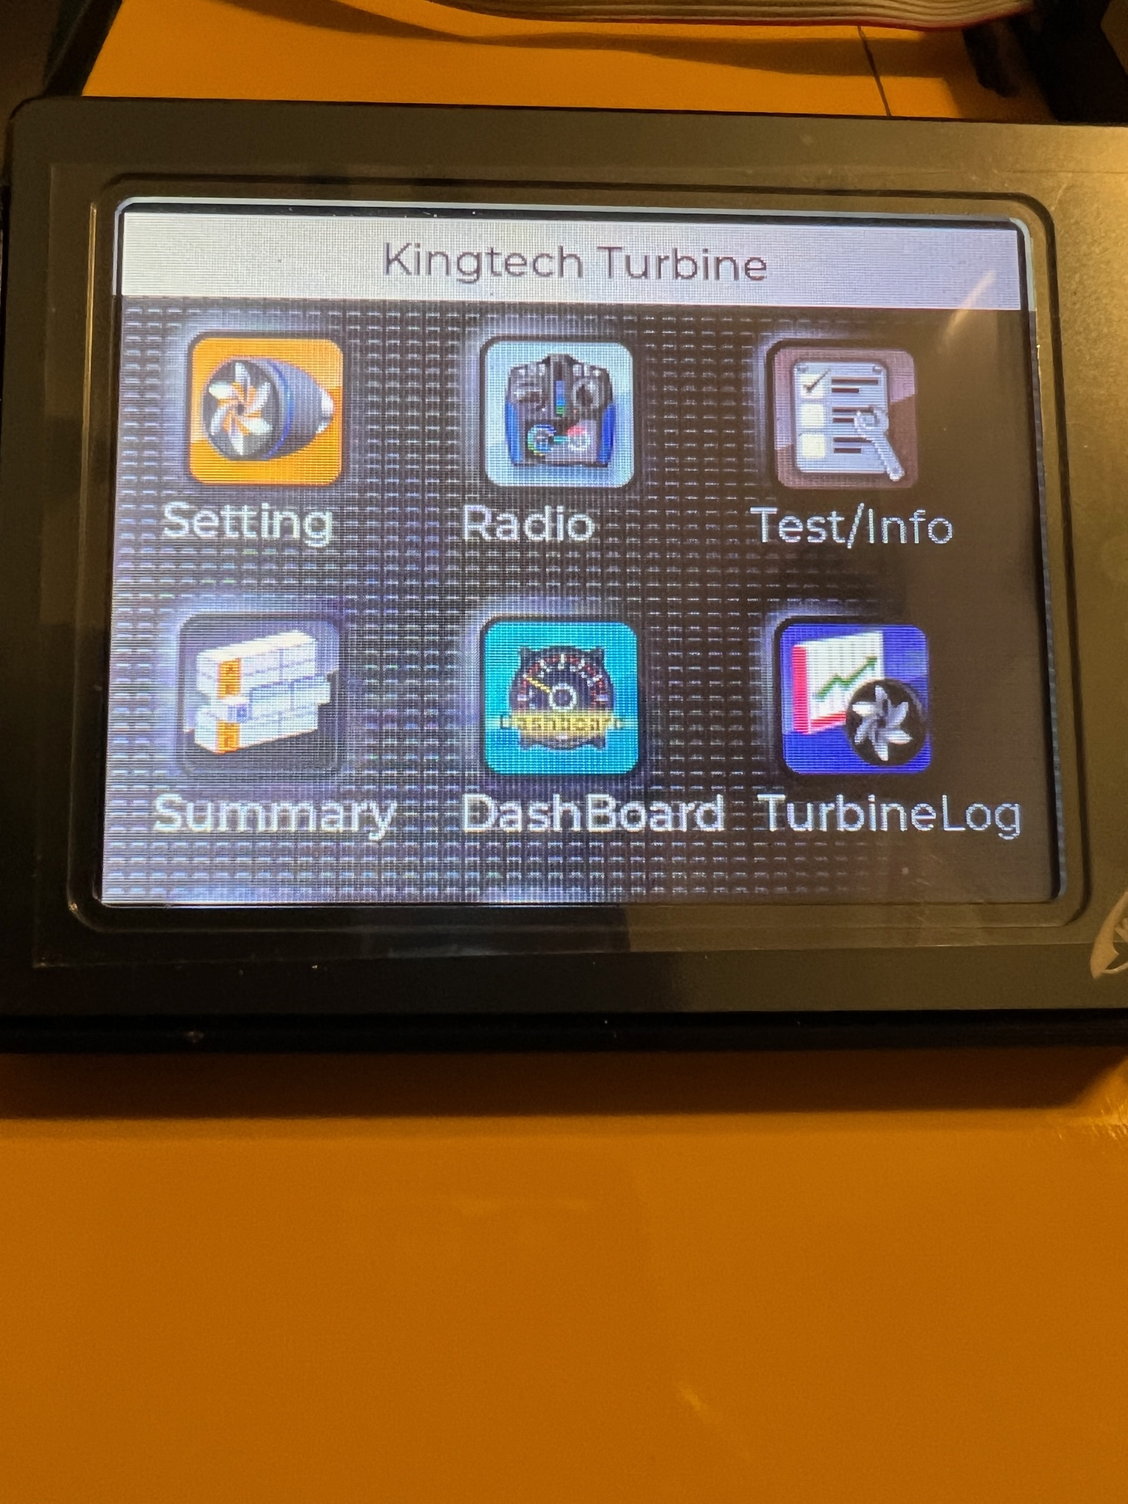
I'm not sure if it's possible to update the software in the screen. This screen is slightly taller but the same width & I notice that at the lower section it shows a version 1.07 software.
Vera will advise what can be done.
W
Vera will advise what can be done.
W
03-23-2023, 10:01 AM
#641
Senior Member
Wayne, I was thinking about your build a couple of days ago, it's great progress and I like the layout.
So with Powerbox, can't you have the engine telemetry on your Tx display screens? With my Swiwin and Jeti Tx, I can display all the engine telemetry on a screen page.
I'm sure Powerbox can display all this . Still love the scheme and colours you used and weight saving it will be a Rocket in and above sealevel.
Russ
03-23-2023, 10:14 AM
#642
Member
Thanks for bringing up the nose gear Sewbusy. That is the next step for me in my build. Is it the way most people marked the retract position, by mounting the retract on top, mark the holes, drill then transfer the retract to the bottom and mount?
Peter
Peter
03-23-2023, 10:14 AM
#643
My Feedback: (1)
Russ,
Jeti and CORE TX's can display the information through his Competition SR2. Futaba requires a separate telemetry sensor. I bought mine from Lior Zahavi - i3dm on YouTube and Facebook. It plugs right into the S Bus on RX1 and then has all the telemetry for the turbine.
Jeti and CORE TX's can display the information through his Competition SR2. Futaba requires a separate telemetry sensor. I bought mine from Lior Zahavi - i3dm on YouTube and Facebook. It plugs right into the S Bus on RX1 and then has all the telemetry for the turbine.
03-23-2023, 10:16 AM
#644
My Feedback: (1)
Peter, the way you described is correct. Wayne mounted his opposite which should be fine. It'll just have a little more nose-down profile on the ground. The nose is so light, it certainly won't hurt anything. Most mount from the bottom.
03-23-2023, 10:25 AM
#645
Wayne, I was thinking about your build a couple of days ago, it's great progress and I like the layout.
So with Powerbox, can't you have the engine telemetry on your Tx display screens? With my Swiwin and Jeti Tx, I can display all the engine telemetry on a screen page.
I'm sure Powerbox can display all this . Still love the scheme and colours you used and weight saving it will be a Rocket in and above sealevel.
Russ
So with Powerbox, can't you have the engine telemetry on your Tx display screens? With my Swiwin and Jeti Tx, I can display all the engine telemetry on a screen page.
I'm sure Powerbox can display all this . Still love the scheme and colours you used and weight saving it will be a Rocket in and above sealevel.
Russ
I guess to each his/her own.
Wayne
The following users liked this post:
Skunkwrks (03-23-2023)
03-23-2023, 10:34 AM
#646
Scott had mentioned it in his thread on the MAX and I just followed suit.... I would highly suggest (IF you're using Electrons) to get one of those.
Wayne
 03-23-2023, 10:47 AM
#647
Member
Hi there Peter...as Scott noted above, that method (marking the holes from above) is probably the best/easiest way of getting the holes right. I did find that using Electron's manual controller was the best way to get the gear centered in the pre-cut hole from the factory. If I used the GS200, I would have had to stand by with my hands on the plug connection and pull it apart at the crisis time when it would crunch into the fuselage. I actually had to widen my pre-cut by 1/8" on one side.
Scott had mentioned it in his thread on the MAX and I just followed suit.... I would highly suggest (IF you're using Electrons) to get one of those.
Wayne
Scott had mentioned it in his thread on the MAX and I just followed suit.... I would highly suggest (IF you're using Electrons) to get one of those.
Wayne
Cheers,
Peter
03-23-2023, 01:17 PM
#648
Senior Member
Russ,
Jeti and CORE TX's can display the information through his Competition SR2. Futaba requires a separate telemetry sensor. I bought mine from Lior Zahavi - i3dm on YouTube and Facebook. It plugs right into the S Bus on RX1 and then has all the telemetry for the turbine.
Jeti and CORE TX's can display the information through his Competition SR2. Futaba requires a separate telemetry sensor. I bought mine from Lior Zahavi - i3dm on YouTube and Facebook. It plugs right into the S Bus on RX1 and then has all the telemetry for the turbine.
In the bright sun it's hard to see the data on the small screen, I must be getting old. Lol
03-23-2023, 01:28 PM
#649
Senior Member
Thanks Russ.... I'm using a JR 28X radio system, so I would have to get a separate sensor (similar to what Scott noted above). However, I want to open my canopy each and every time I am starting up the turbine...so I really don't need a display on my radio when I already have one on the Rebel Pro. Furthermore, I've stood beside pilots flying with a JETI system and all I could hear was chatter from their radio throughout the entire flight...telling them this and that!! When flying a sequence (which is what I do) distractions are not needed.
I guess to each his/her own.
Wayne
I guess to each his/her own.
Wayne
I to only like my caller to see the improtant screen info , i agree it's better for only extreme warning to be announced . Chad my friend finds the same thing with warings or alarms going off it can be very distracting while loosing focus of flying the aircraft.
03-23-2023, 01:31 PM
#650
Senior Member